Site Builder Guide
🌐 Ready to Create Your SalesMFast Site?
Ready to create that amazing SalesMFast site for your viewers to visit? In this article, we’ll walk through the Site Builder, Settings, and more. It’s time to LevelUp your business!
🏗️ What are Sites?
Sites give you the ability to create client-facing websites within SalesMFast.
✅ Build a perfect homepage for your business ✅ Launch a landing page to capture leads ✅ Design anything you need — the possibilities are endless
🔧 Site Types in SalesMFast
Within SalesMFast, we have two types of Site Builders; while they are similar they do have different functionality. Let’s review each type of Site.
📈 Funnels
In general, funnels have a very direct sequence of pages, which is why we offer split testing on funnels only. Funnels are a step-by-step series of web pages, generally used for a specific purpose like capturing leads or booking appointments.
🖥️ Websites
A place to build web pages for any use case, such as a homepage for your business. There is generally no path of progression that contacts are led through, which is why we do not offer split testing on websites.
Though you can use Websites for much the same reasons as funnels, websites are different in some small ways.
❓ Funnels or Websites — Which One Should I Choose?
In all but a few ways, funnels and websites are the same. They both house a group of webpages and they can be used for various purposes despite which one you choose. What matters is if you want to use a Split Testing feature on a web page and the page views UI.
🔍 The Main Differences Between Funnels and Websites
-
Split Testing in Funnels Only Funnels support split testing. This means you can create page variations to see which version performs better for conversions.
-
eCommerce (Online Store) Only Websites support online store features, allowing you to sell products directly from your site.
-
Page View UI The user interface for viewing and managing pages is different between Funnels and Websites, tailored to how content is structured in each.
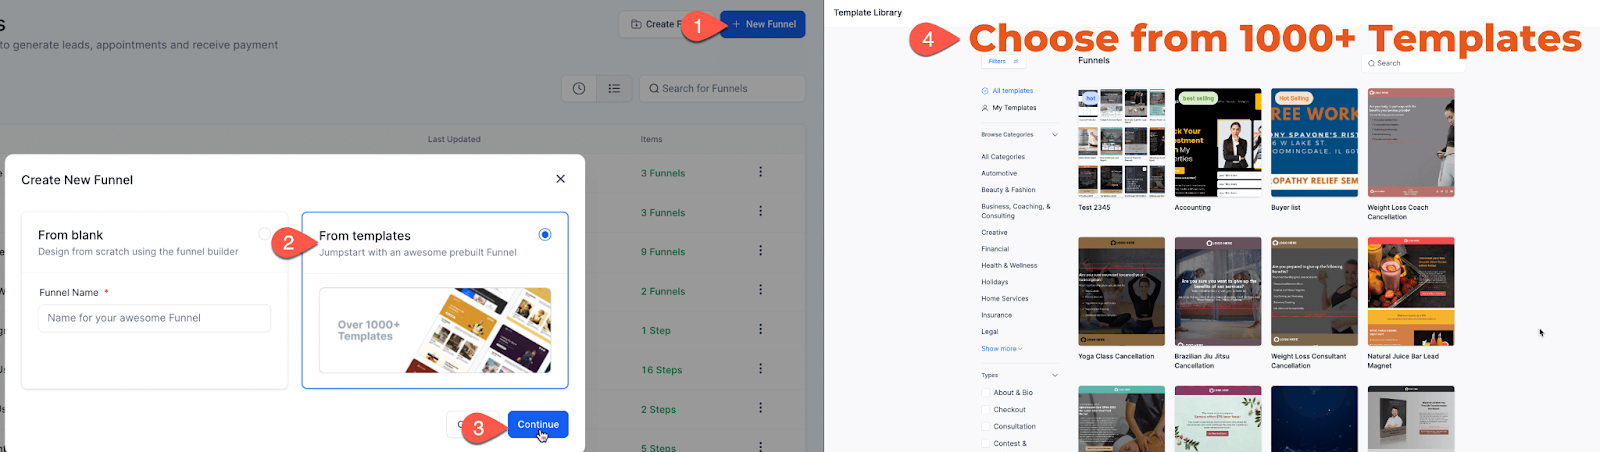
🧰 Getting Started with Site Templates
When you go to create a new site, you’ll have the option to choose from hundreds of templates. Once you've selected a template, you can edit any or all parts of it to suit your needs. We encourage you to explore them all — there's something for every style and purpose!
✏️ How to Start Editing
After selecting your template:
- The template will automatically load
- If you aren’t already inside a page, click “Edit” on any page
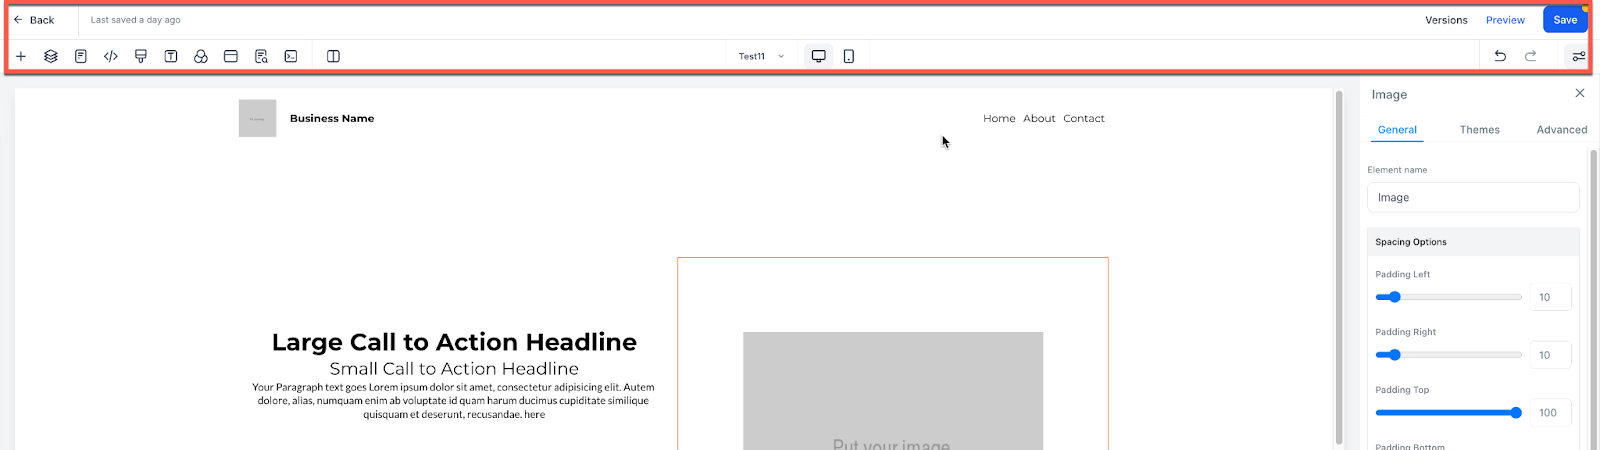
- This opens the Site Builder, where you can start customizing the content
👉 Learn more about Site Builder
🌐 Site Settings & Publishing
Now that your site is built let’s review the backend settings of our site. Let’s walk through each of the backend site settings together.
📄 Site Pages/Steps
This is where all of the pages or steps of your site live. You can edit or preview a page from here. We land here before entering into the Site Builder. Upon exiting the Site Builder, we also land here.
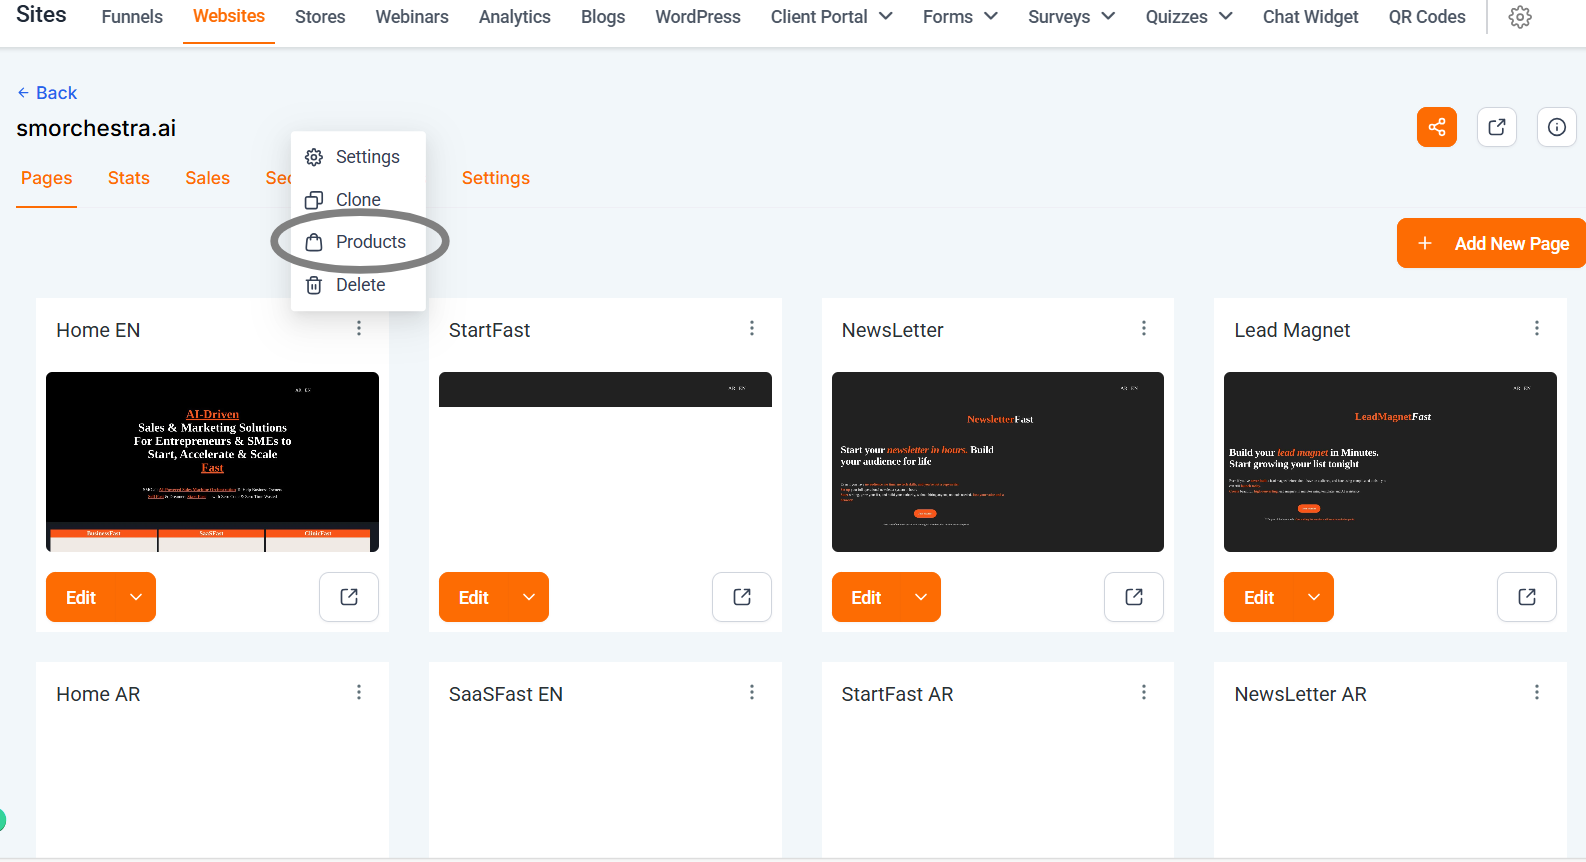
🛒 Attaching a Product to Your Site Page (Order Forms)
To use order forms on your site, you must attach a product you have created in SalesMFast to your specific page. Products need to be added to the page a viewer will use to checkout and purchase your product.
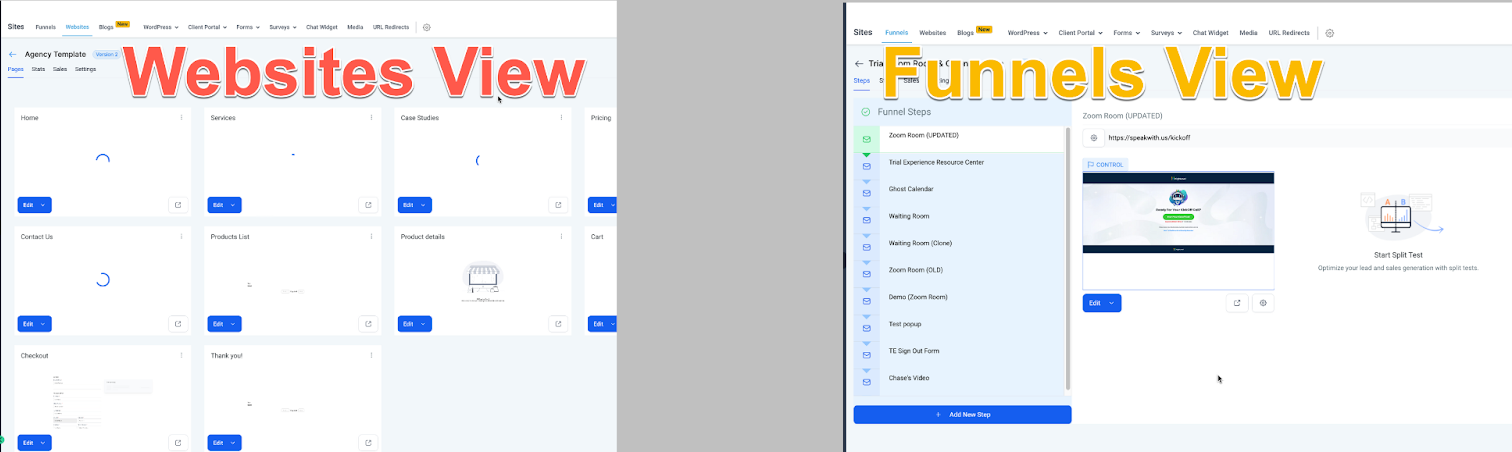
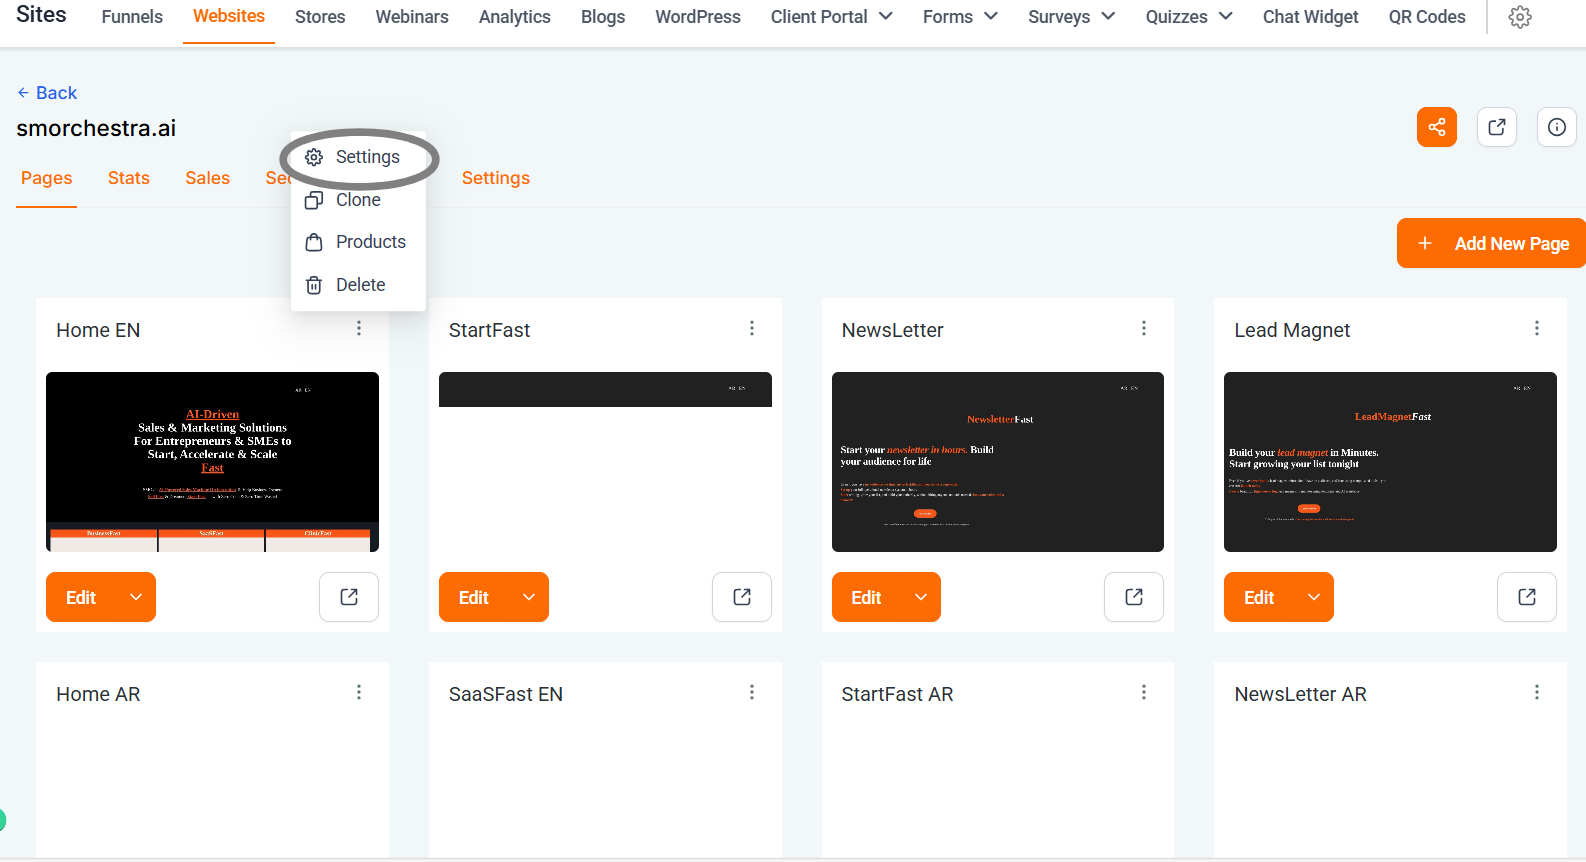
On Websites, you click the three dots on the top right of the page, then select products. For funnels, you select the step, then select products in the top right tab.
Website View
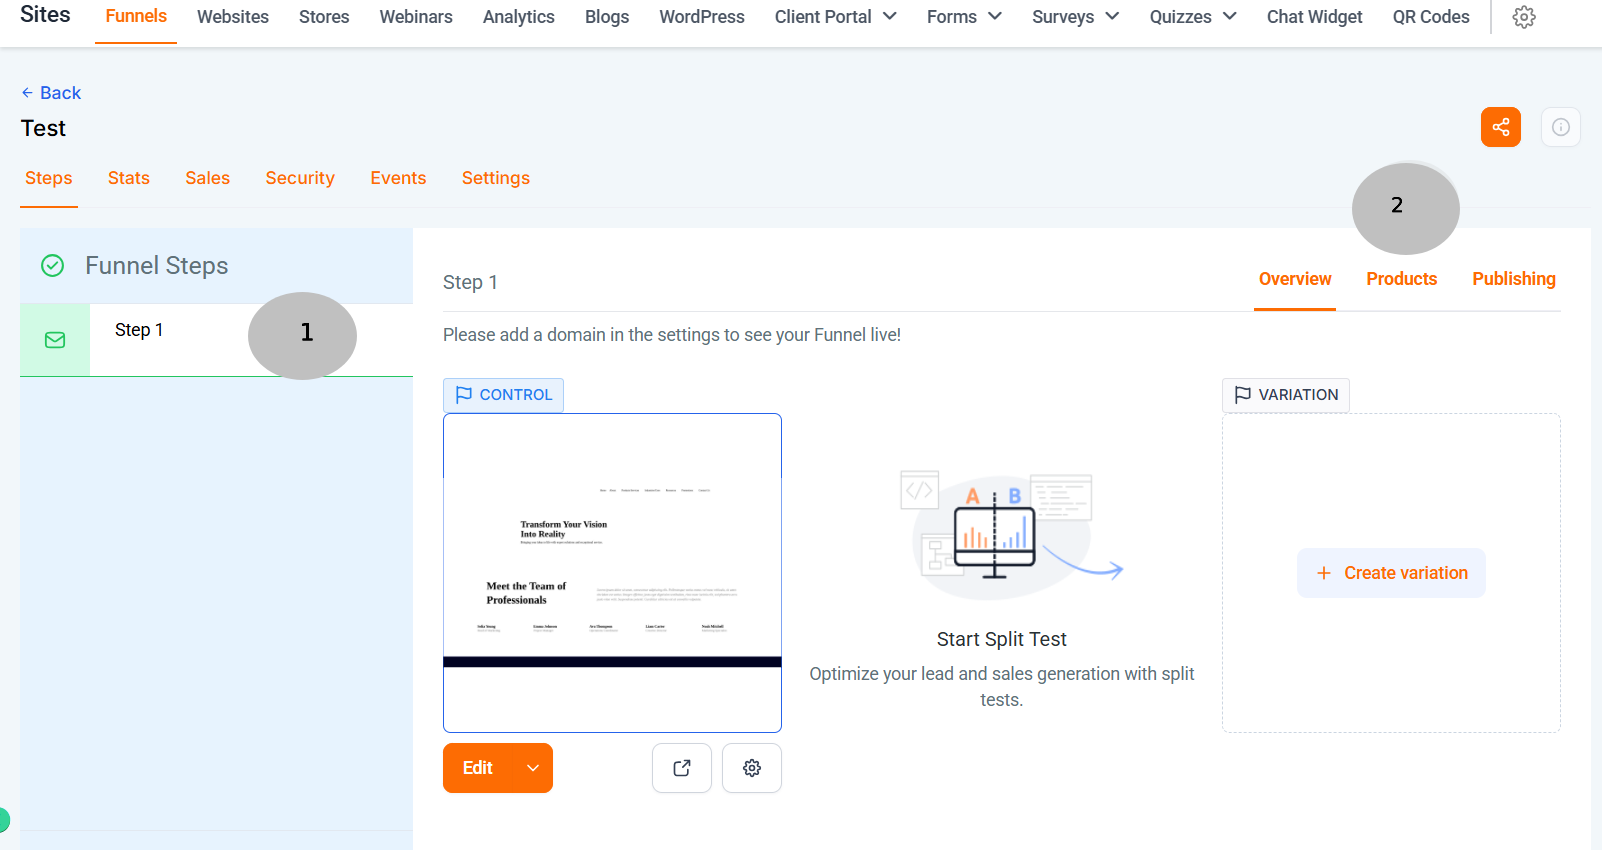
Funnel View
After arriving on the Products tab for a page, we will need to add the SalesMFast Product. If one isn’t created in your Sub-Account already, you will need to create one. You can learn more about our Payments features here.
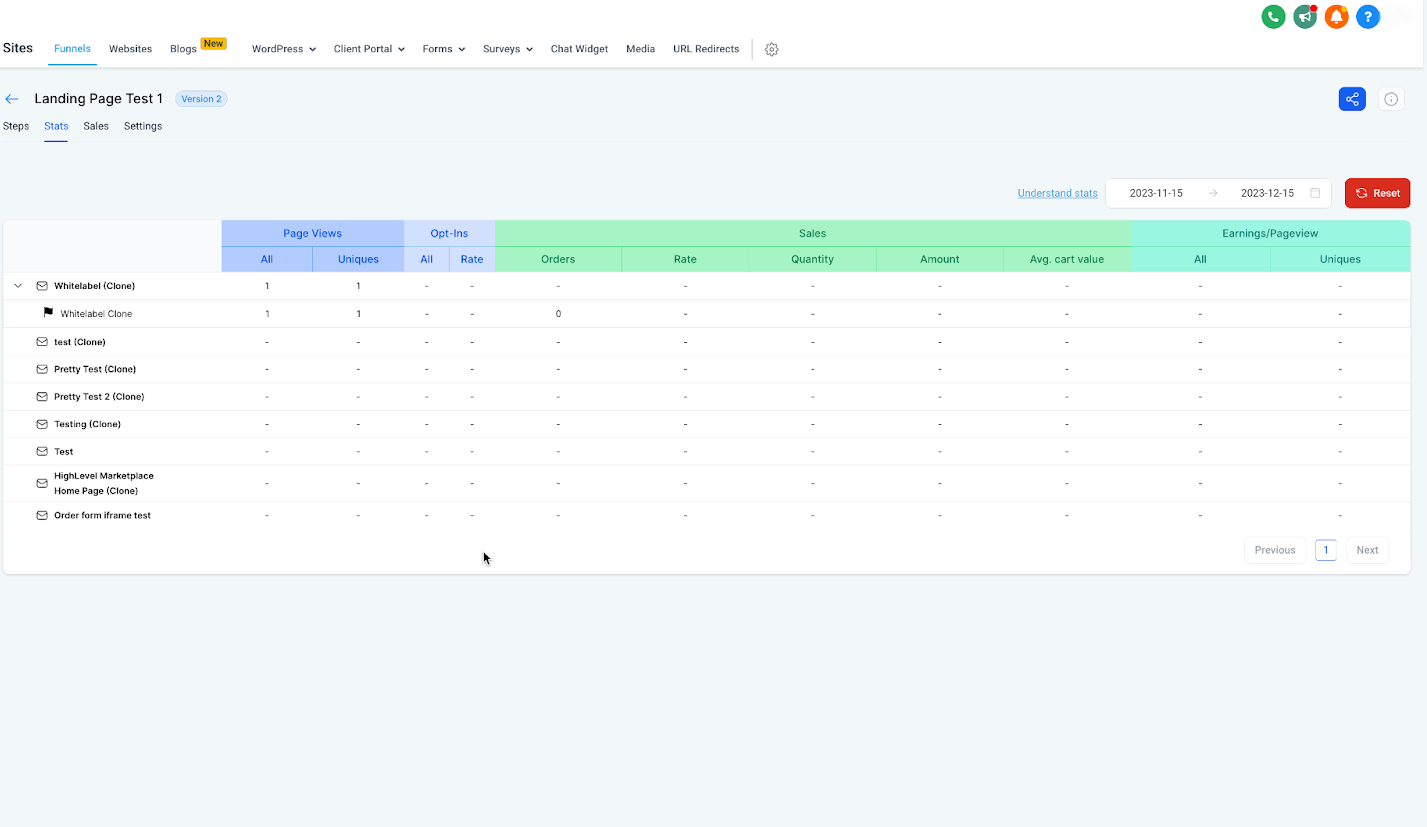
📊 Site Stats
Stats will give you insights into the number of page views and opt-ins you have had on your site. In addition, you can see the number of sales and even earnings. Learn more about stats and what they count here: Understanding Stats.
💵 Site Sales
Reveals each transaction that has occurred on your sites. For Version 2 sites, we have moved this to the Payments Tab > then select Orders and Transactions tabs.
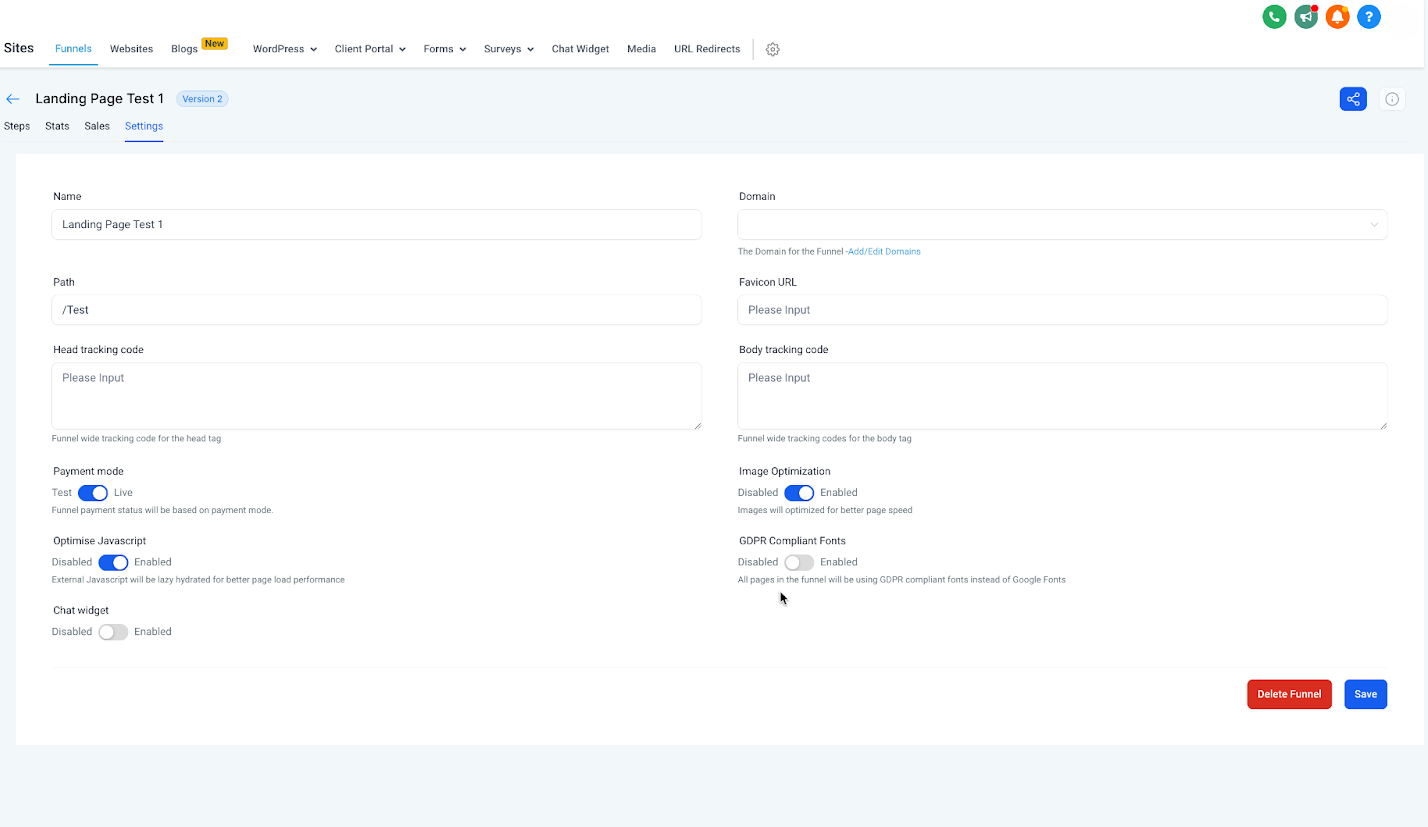
⚙️ Site Settings
Site settings give you the ability to attach your domain, update the default path, add a favicon, and more! Let’s unpack each of these together.
-
Name - is the name you give your site. This does not appear to your customer, this is for internal use only.
-
Domain - is the domain you choose to assign to your website. For example: SalesMFast.com is our domain we attach to our Site. Without a domain, people will be unable to visit your site. Unless you use a preview link, but these are uncustomizable and not recommended.
-
Path - is the default path or extension for your site. It looks like this when used, SalesMFast.com/about → the “/about” is the path. Each page on a funnel or website will have its own path, and no two pages can be directed to the same path.
-
Favicon - is the small icon that appears at the top of your browser tabs when someone opens and views your site. You must add a shareable image URL here, after being added, it will load the favicon for all of the pages of your site. Learn how to 👉 upload, store, and copy the share link in SalesMFast here (LINK TO FAQ).
-
Head tracking code - installs a site-wide tracking code into the header.
-
Body tracking code - installs a site-wide tracking code into the body.
-
Payment mode - if you have products attached to your site, then you can automatically switch your payment mode to test or live. Test, allows you to use Stripe testing cards` to fill out the form and then run a test. Great for testing your funnel. However, as you get closer to launch, a live purchase is encouraged - you can always refund yourself.
-
Image Optimization - will automatically adjust your images to load faster. It is on by default and is generally not recommended to disable it as faster loading times result in a superior page experience for viewers.
-
Optimise Javascript - Javascript is custom code you can install to run special operations on your sites. Oftentimes, JavaScript can impact loading speeds, enabling this will assist in page loading. The External Javascript will be lazy hydrated for better page load performance.
-
GDPR Complaint Fonts - depending on your legal needs, GDPR complaint fonts can be enabled, removing all of the fonts, so your site can work to become more compliant with laws and regulations. Always consult a lawyer to ensure you are fully compliant.
-
Chat Widget - Your chat widget can be customized and set up under Sites > Chat Widget. Enabling this will deploy this chat widget to all of your websites. To deploy on specific webpages, keep this disabled then copy the code to the specific pages you want the widget on. Learn more about your chat widget here: SalesMFast Chat Widget: How to Add It to Your Pages in Minutes
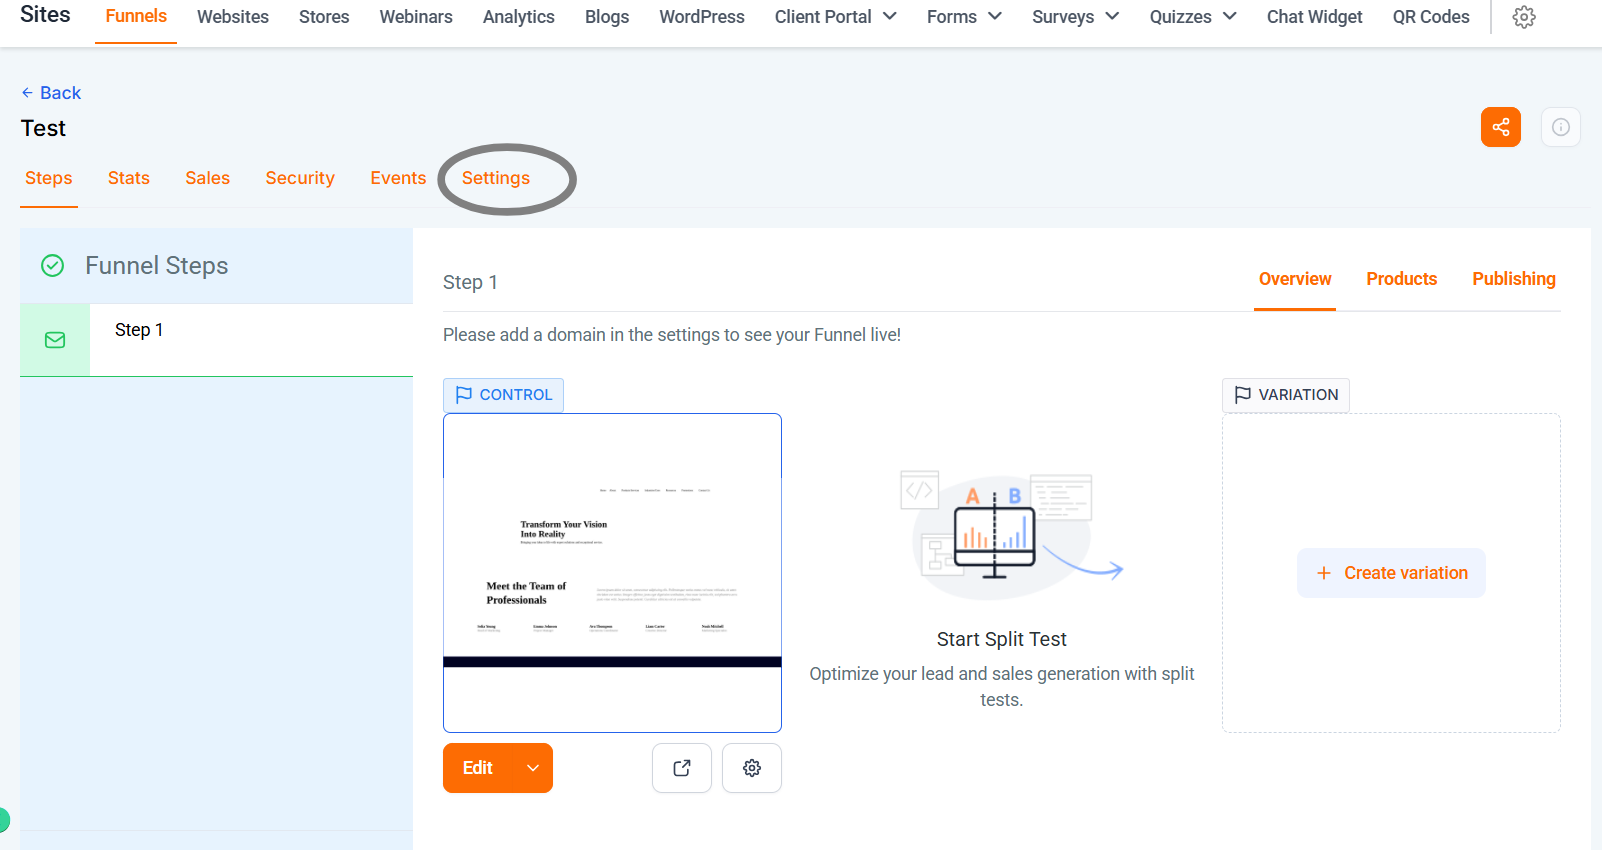
🚀 Publishing/Page Settings
To change the name of a step or site as well as the path or extension… In the site builder, you can click the three dots then select settings. Within the funnels, you select the funnel step then select the “Publishing” tab.
Website View
Funnel View
From here you can edit the step/site name as well as the path. The path for your a page/site goes at the end of a URL. For example: SalesMFast.com/about → the “/about” is the path. You can set these, otherwise, we will provide a random one. If the path already exists or is being used on your domain, it will add numbers as you cannot have repeat paths.
✅ We are now ready to publish and use our site! Great job!
Now that we have build our sites and updated all the settings, we are ready to use it to LevelUp our business!
❓ FAQs
🌍 What are Global Sections?
Global sections are saved sections that you can use across multiple pages. They are unique in that you can use the same section across multiple pages. Further, making any changes to a global section, after saving, will automatically update it to all pages the Global Section is used on. A great example of a scenario to use a global section would be the Header/Footer of your website. Using a Global section as a footer or header enables you to have the same header across all of your pages.
All we need to do is have a section we like, such as a header for our page, then hover over the object, click the Save Icon, name it, select “Global Section,” then click Save. Now we can add this same global section to all of our pages.
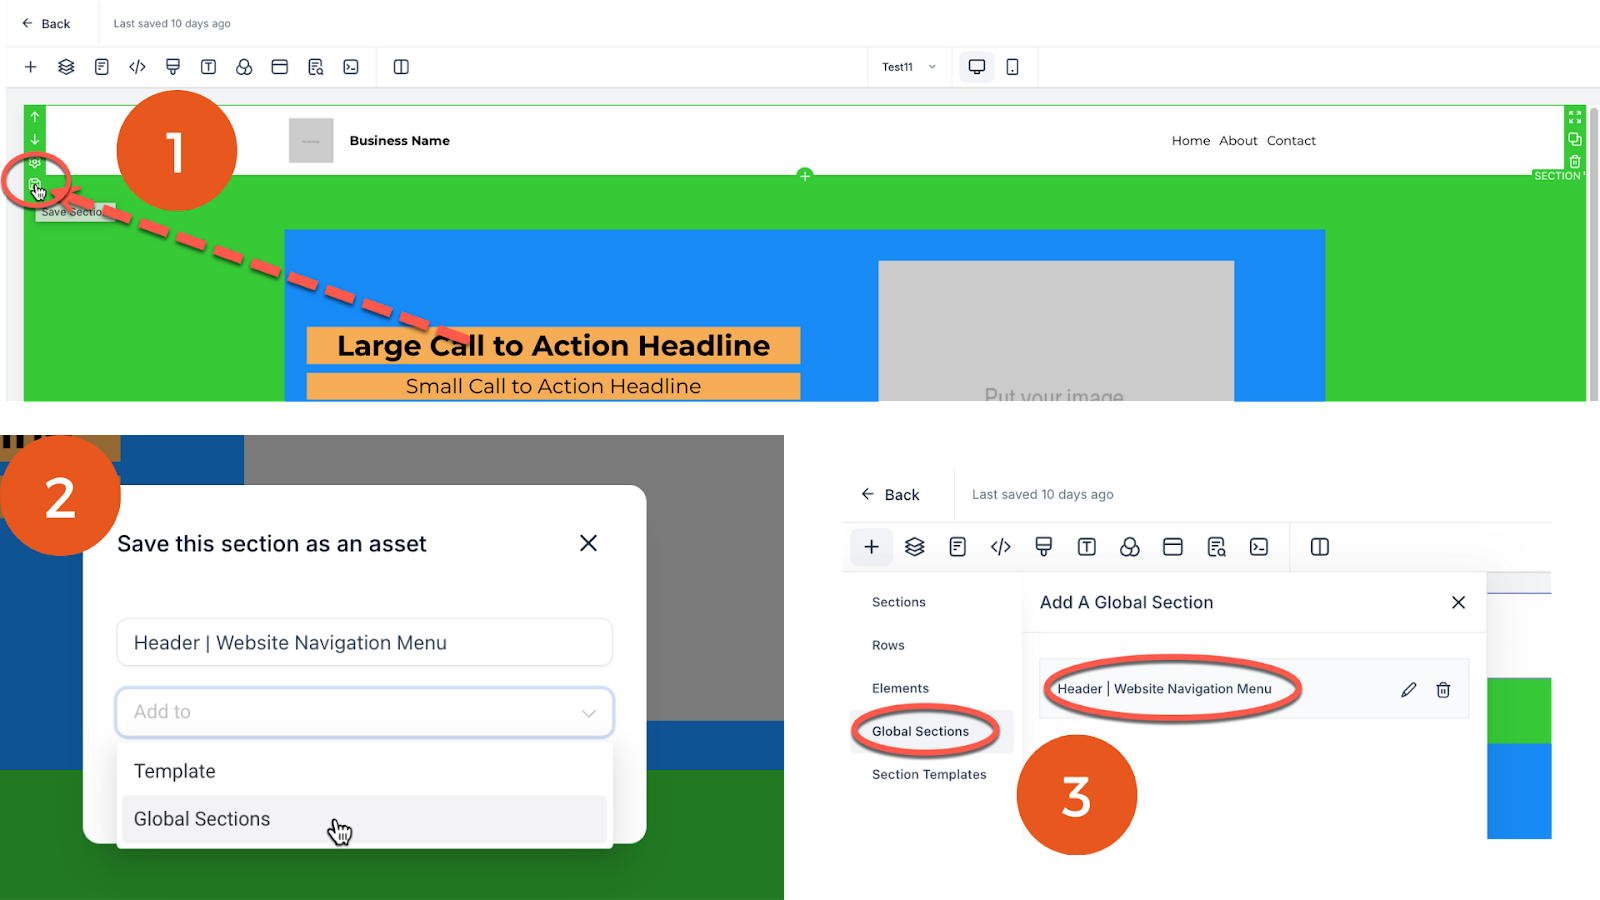
Remember: any changes to this Global section, after saving, will update this section in all of the pages it was used. Further, global sections are not automatically placed, you must add them.
To add a Global section, click the “+Add Element” Icon in the top right of your builder. Then select → Global Section → Select your global section.
🧩 What are Template Sections?
Similar to a Global Section (see above), a Template Section can be saved and then added later within the same webpage or another webpage. Changes made to these sections saved to the Template Section in use will not update the templates or other places the template was added.
🧭 What Are Funnels?
The term funnel in marketing means a series of websites used to capture leads. Funnels have “steps” that allow you to visualize a series of websites that a potential customer will visit. For example, in a booking funnel, I might have 3 Funnel Steps:
- Landing Page – where you can offer something for contacts to download in exchange for their contact information.
- Booking Page – After a contact fills out a form, you will want to thank them but then schedule a call with them. So you have your booking calendar on this step.
- Thank You Booking Page – After a client booked the call, they will land on this page, showing them the next steps and thanking them for booking.
Funnels usually serve a specific purpose, like offering a lead magnet or booking an appointment. There are many use cases for creating funnels. Whatever the reason, Funnels are a useful way to create a series of websites that contacts navigate through.
📱 How to See the Mobile View of a Website on your Desktop?
When editing your site, you may find you want to see the mobile view of your website. Did you know you can see the mobile view of any website on your desktop?
Steps:
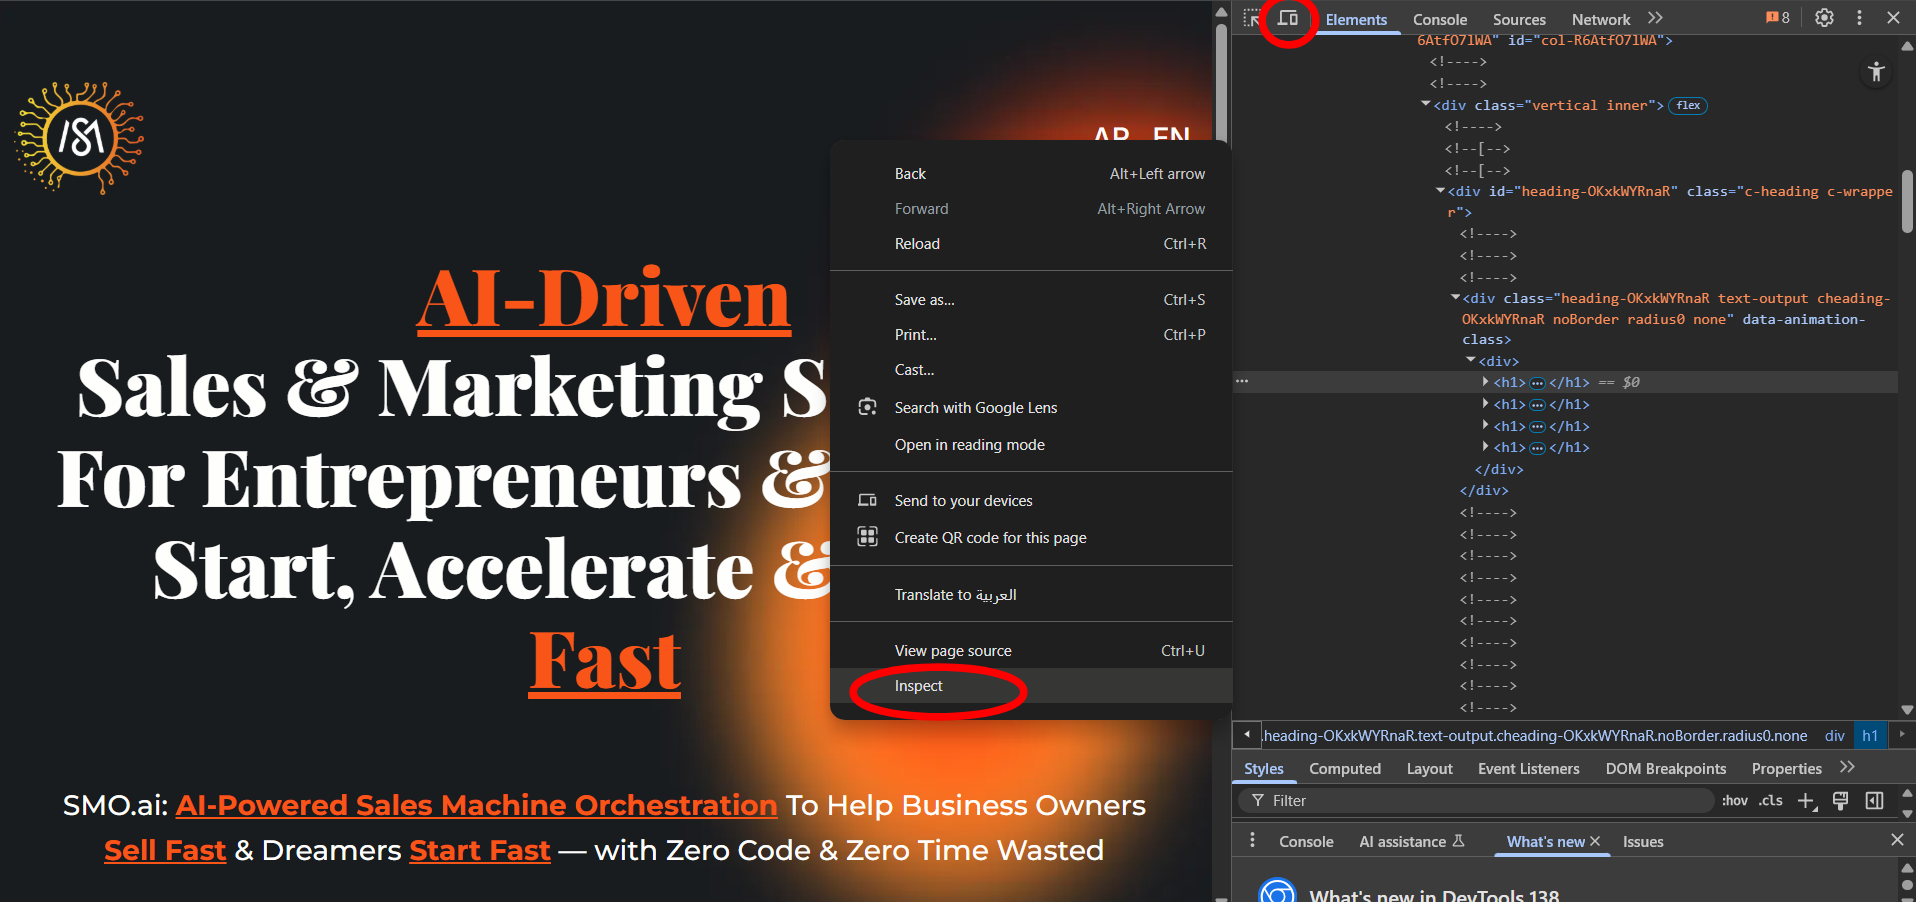
1. Right click on the loaded webpage
2. Click Inspect
3. Toggle the view from desktop to mobile (📱)
🖼 How do I upload and get a sharable image link in SalesMFast?
To load an image, you must either upload your image to SalesMFast or provide another shareable link. You can do this in Google and other areas, but let’s review how to do this in SalesMFast.
- Within a Sub-Account, go to Settings > Media
-
Click Upload File in the top right-hand corner of the media library
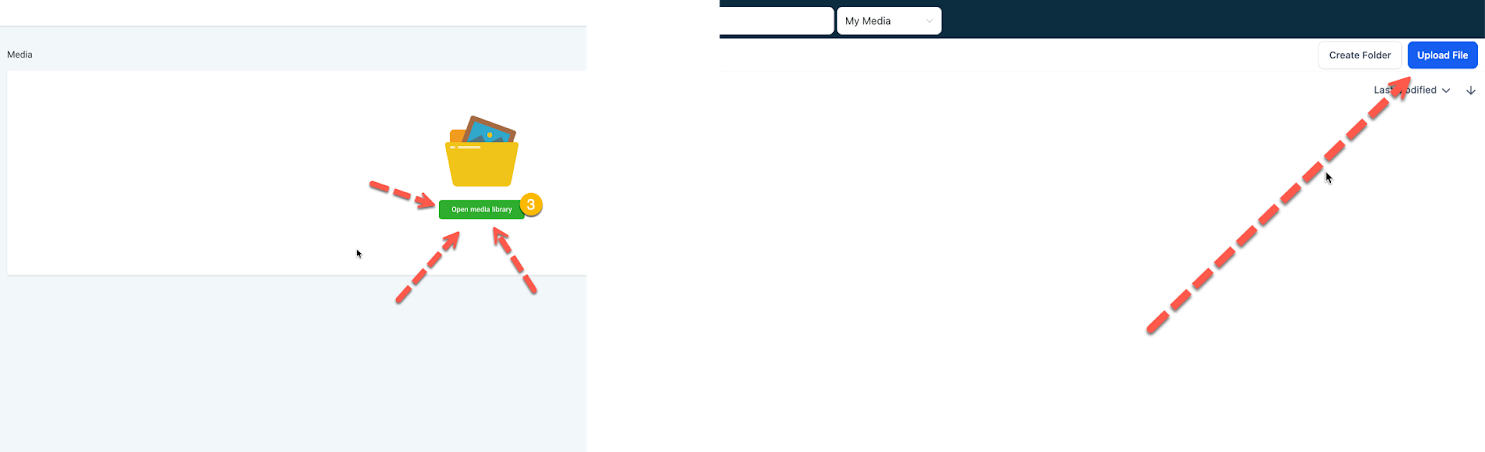
-
After successfully uploading the image, right-click on the image and copy the link
Use this link when a media-shareable URL is required. For example, within Site Settings, the Favicon requires a shareable media URL. You paste this newly uploaded image URL so your favicon will load.